Episode 9. Cuttings & Potting
on
A bit
of my “cuttings” history
I do not use any type of rooting hormone when taking any type of
cutting; they are taken and then put straight into my medium of choice.
I have used different types of Rooting Hormones when I first started to
grow begonias however I found that depending on how much rooting hormone
powder stayed on the bottom of your cutting when you dipped your cutting
into it, could result in the “burning” of the base of the cutting
resulting in no root growth.
I have tried numerous types of medium from commercial starting mediums
to just peat & perlite or peat & silver sand.
But the best and most reliable cutting & rooting medium that I have
found is Coco Natural which I get from a local Hydroponics Shop, as you
cannot over water or compact it and it does not sour and I hardly lose a
cutting using it.
Taking Cuttings “my way” –
Every grower will have his way of taking cuttings, the following is the
way I do it and once again this works for me.
Basal Cuttings –
 I take them when they are a lot smaller than most growers would because
I believe they want to root a lot quicker when they are smaller /
younger. I know Ian Donaldson believes this as well as he takes his
cuttings younger / smaller than mine. He is the only grower who I have
spoken to up to now who takes a smaller cutting than I do.
I take them when they are a lot smaller than most growers would because
I believe they want to root a lot quicker when they are smaller /
younger. I know Ian Donaldson believes this as well as he takes his
cuttings younger / smaller than mine. He is the only grower who I have
spoken to up to now who takes a smaller cutting than I do.
I don’t wait for the basal cutting to develop roots before I take it
because of the following.
• I will take them off a tuber in the hotbox / propagator to thin them
out or get that tuber down to the best “stem” on it at this stage. If
you wait until you pot the tuber up before you take the basal cutting
then it will be too big and will take longer to root.
• They don’t take long to root, as they are young and virile and want to
grow to survive at this stage given the correct medium, moisture, heat
and light.
• The quicker I can get them off the tuber more energy gets channelled
into the shoot that you have picked to be the main one because it’s
probably the most advanced at this time or has a better position on the
tuber.
• With them being small you don’t have to cut side shoots off, trim
leafs down or stick a stake through the heart of a leaf to help stand it
up.
• So in fact you are just performing 1 cut and not 4 – so the cutting is
a little happier and has only 1 wound to heal.
When I have taken the basal cutting off the tuber I dust the wound with
sulphur and leave the wound open to the air to dry out for a couple of
days then just back fill the hole.
I fill a tray full of coir put it on a small Shankley propagating unit
and water it in and let it stand for a day or two days to come up to
temp. I just insert the cutting in the coir when I take them and just
insert a label next to the cutting and water it in using warm water.
If for whatever reason I have to take a large cutting then I fill a
2inch square pot with coir and insert the cutting down a corner of the
pot. Don’t ask me why but a cutting seams to root better in the corner
of a pot. Then just water it in and let it stand on the hotbox with a
little bottom heat and let nature take its course.
“Stem cuttings” –
This type of cutting is usually what I call the second wave of cuttings,
as we take the basal cuttings
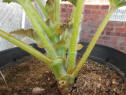 first and then when the plant and stem grow
we take the second wave of cuttings which are usually this type.
first and then when the plant and stem grow
we take the second wave of cuttings which are usually this type.
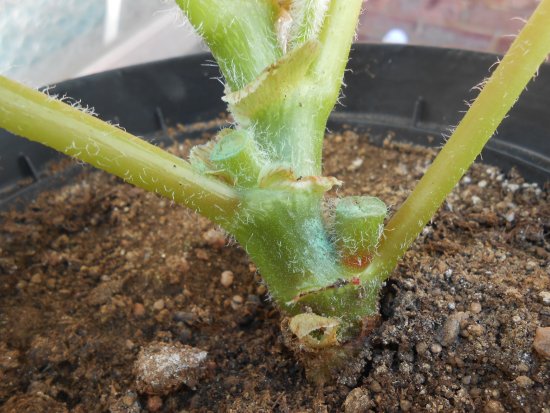
These are the ones that come up from the between the main stem and leaf
stem (see picture on the left hand side).
Again just like my basal cuttings I take them when they are on the
small side for the following reasons -
• The quicker I can get them off the main stem more energy I can keep
channelled into the plant.
• With them being small you don’t have to trim down the leaves or stick
a stake through the heart of a leaf to help stand it up.
• So in fact you are just performing 1 cut and not 3 – so the cutting is
a little happier and has only 1 wound to heal.
Due to issues I have experienced with stem rot I don’t take these
cuttings by cutting a “v” in the leaf axis and pushing the cutting out.
What I do is take the cutting by making my cut ¼ to ½ inch up the
cutting just leaving enough to pinch the top out. This “stub” will just
naturally seal itself at the bottom crystallise and fall off (See
picture on left hand side).
 Just like the way I treat a basal cutting’s I fill a tray full of coir
put it on a small Shankley propagating unit and just insert the cuttings
in the coir when I take them and just insert a label and water in.
Just like the way I treat a basal cutting’s I fill a tray full of coir
put it on a small Shankley propagating unit and just insert the cuttings
in the coir when I take them and just insert a label and water in.
If I take a large cutting I do tend to fill a 2inch square pot with coir
and insert the cutting down a corner of the pot. Then just water it in
and let it stand on the hotbox with a little bottom heat and let nature
take its course.
Leaf
Cuttings –
If I face one the following dilemmas, then leaf cuttings are a simple
and easy way of increasing the
 availability of cutting material.
• I could be short of some varieties.
• Certain varieties just don’t like throwing cutting material.
Now I find the younger the leaf the easier it is to root.
Again I take these whilst they are still on the “small” side for the
following x2 reasons.
• With them being small you don’t have to trim the leaves down or stick
a stake through the heart of a leaf to help stand it up.
• So in fact you are just performing 1 cut and not x3 – so the cutting
is a little happier and has only 1 wound to heal.
I also make sure I take enough leaf stem so it can rest on the lip of
the pot and where the stem just inserts into the coir to a depth of
about ½ inch..
Now I pot a leaf cutting up slightly differently, I use small round pot
again with coir but this time I insert the leaf cutting in the centre of
the pot so the leaf sits on the lip of the pot to help support it.
Then again it’s sat on the hotbox with a little bottom heat (please see
cross section picture on left).
Potting
Cuttings on –
 Now at this point all my cuttings are treated the same. I just need to
see signs of root then they are potted up straight away.
Now at this point all my cuttings are treated the same. I just need to
see signs of root then they are potted up straight away.
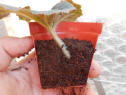
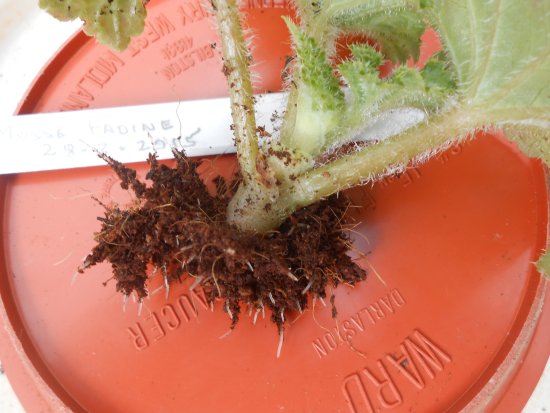
I do this by filling 1 litre square pot with my home made multi-purpose
compost, and then gently getting hold of the cutting I gently take it
out of its propagating tray or pot and then gently shake the spare coir
off (see picture on left hand side) then insert the rooted cutting into
the multi-purpose compost (see picture on right).
rooted cutting into
the multi-purpose compost (see picture on right).
Then tap the pot to settle the medium add a little water and that’s it –
done.
The new craze in cuttings!!!!! –
The latest craze to hit the cut bloom scene is to root and grow a
cutting and flower and exhibit it in the same year.
I must admit to trying it with the following x2 varieties last year -
Beryl Rhodes and Sweet Dreams. From my own experience with this method
of growing is that the flowers seem to be short of a row of petals and
at the end of the year there was no sign of a tuber under the plant.
However saying that I did get a flower of Beryl Rhodes on my 12 board at
Southport.
This year
I will try the same technique but on Symestar, Colin Hamilton &
Alexandria as it is said you get a better flower from these x3 varieties
when shown young, and I know growers in Scotland have tried
 and succeeded to get a great flower and a good sized cutting tuber at the
end of the year.
and succeeded to get a great flower and a good sized cutting tuber at the
end of the year.
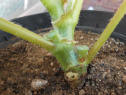
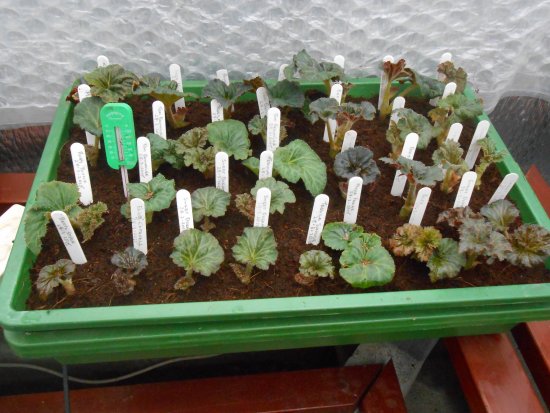
Well I have some basal cuttings of Symestar, Colin Hamilton & Alexandria
taken on Saturday 4/04/2015 we will see how they progress (see picture
on the left) through the year.
On Ian Donaldson’s winning 12 board at Ayr last year he had a bloom of
Symestar and Tigga both grown from that years cuttings – so it can be
done – and you have nothing to lose by trying it.
The big cutting enigma of 2014 -
I have been after a cutting of a variety called Robert Tyler Murphy
Bryce for a couple of years now and where did I manage to acquire one I
hear you ask!!! Well let me tell you it was in a raffle on the North
 West Begonia Bureau Stand at Southport Flower Show last year. I managed
to keep it going through winter only to find it had not formed a tuber
at all but just a 5 inch section of stem with root on. Of all the
cuttings I had it had to happen to this one; however it did start
growing again from a small side shoot at the top of the old stem. So at
the start of March I took my first cuttings of the year, I took the top of
the new stem growth off as a cutting. I then re-potted the “plant” that
was left as there were signs of fresh white roots starting to appear
around the sides of the old “square root ball” (see picture on left hand
side).
West Begonia Bureau Stand at Southport Flower Show last year. I managed
to keep it going through winter only to find it had not formed a tuber
at all but just a 5 inch section of stem with root on. Of all the
cuttings I had it had to happen to this one; however it did start
growing again from a small side shoot at the top of the old stem. So at
the start of March I took my first cuttings of the year, I took the top of
the new stem growth off as a cutting. I then re-potted the “plant” that
was left as there were signs of fresh white roots starting to appear
around the sides of the old “square root ball” (see picture on left hand
side).
Will it produce a tuber by the end of the second year; the answer is I
honesty don’t know but a will take every stem cutting it throws out and
any spare leafs as well.
Wednesday
8th April
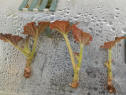
Disaster no1 -
When leaving for work at 0530am I opened the greenhouse doors but forgot
to take the lids off the
 Shankley Propagators before I left for work.
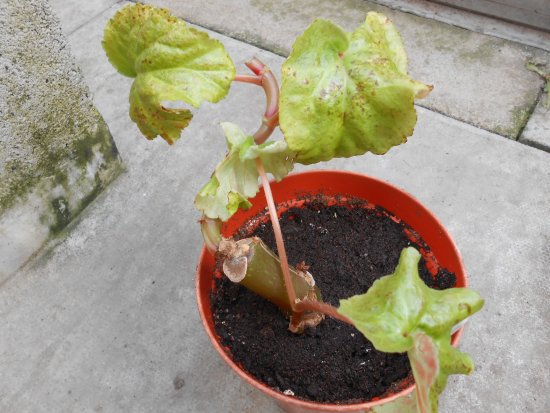
When I got home and realized what I had not done, I got the lids off
straight away. Alas it was evident that the sun, a bubble wrapped
greenhouse and a lidded propagator Unit was just too much for a couple
of cuttings. As you can see by the picture on the left that was taken
today, just 1 day later the signs of Sun scorch on my cuttings are all
to evident. I was lucky I only had 6 cuttings that were affected.
Shankley Propagators before I left for work.
When I got home and realized what I had not done, I got the lids off
straight away. Alas it was evident that the sun, a bubble wrapped
greenhouse and a lidded propagator Unit was just too much for a couple
of cuttings. As you can see by the picture on the left that was taken
today, just 1 day later the signs of Sun scorch on my cuttings are all
to evident. I was lucky I only had 6 cuttings that were affected.
There is only damage to a couple of leaves on each cutting so I might
just cut them off and pinch the top of the leaf stems. They then should
just crystallize at the bottom and just fall off. Then the next wave of
leaves will be coming through, so it now has nearly recovered and you
would never notice that a disaster had befallen the cutting.
The the only problem with working a 0600-1400hr shift is that you have
to second guess the weather before leaving at 0530hrs for work as you are
stuck with that decision till you get back home sometime after 1500hrs.
Disaster no2 –
Had to begrudgingly hand back my “J.Munson Trophy"
(Twelve Cut Blooms) today – not a happy
bunny – however I will have my name engraved on the trophy, but it has
made me even more determined to try and win it back again, and not just
rest on my laurels because I was lucky enough to win it once.
As my mother keeps telling me – God loves a trier….
Until next
time….


