Episode 3. January
Saturday 17th. January
I started taking my cutting tubers out of the
pots today and will be doing so for the next couple
of days as it’s a job I don’t want to rush. I have
developed the following habits over the years,
whether it’s right or wrong, all I know is it works
for me.
Stage 1 - I brush the top of the tuber cutting
so it is clean which enables me to take the scab off
with ease – yes I actually de-scab my cutting
tubers……….and yes I know that not many other people
do! The reason I do this is because I believe there
are two types of cutting tuber.
• The 1st type of cutting tuber is where
the stem comes away in a whole piece. If you look at
the scab you will find it covered with what looks
like a layer of skin. I just gently scrap this off,
dry and lightly dust with sublimed sulphur.
• The 2nd type of cutting tuber is where
the stem comes away in segments - just like an adult
stem, and also just like an adult tuber, you will
find small segment still attached to the cutting
tuber. Again I just gently de-scab the cutting
tuber, as I would an adult tuber, dry and lightly
dust with sublimed sulphur. If you do not carry out
this process it will rot back and ruin the tuber
completely.
Stage 2 - I take the bulk of the compost from
around the cutting tuber. I do not brush the sides
or bottom
 for
the following two reasons:-
for
the following two reasons:-
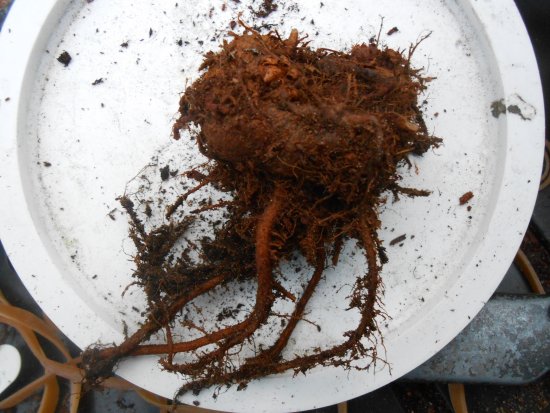
• The main reason for this is if you look at the
roots of a cutting tuber you will notice some big
thick fleshy roots amongst them, they almost look
like “tap roots” attached to a cutting tuber
(please see the picture on the left). You don’t want
to take these off the tuber cutting as they act as
food storage or ‘organ’ as it is known.
• The 2nd reason is the cutting tuber or ‘skin’ is
still very soft due to it not being properly formed
– so any brushing at this point could and will cause
damage by ‘skinning’ the cutting tuber which results
in the lack of root regrowth to the area.
Before you put the cutting tubers back in
compost, gently brush the rest of the cutting tuber
down ensuring you leave those big roots on. Any new
roots will grow from these large roots as well as
from the tuber.

At this stage I usually breathe a big sigh of relief
if I find no sign of them ‘little white critters’
(Vine Weevil grubs) in the pots or any signs of them
on my cutting tubers.
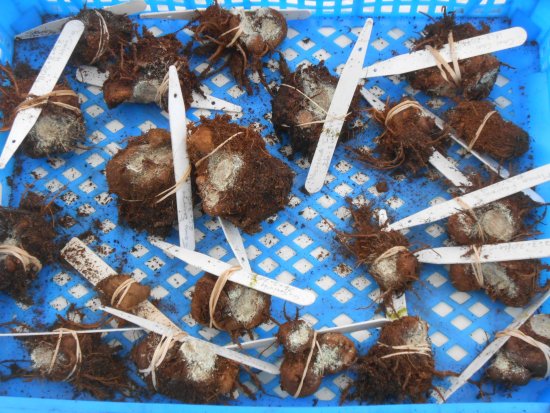
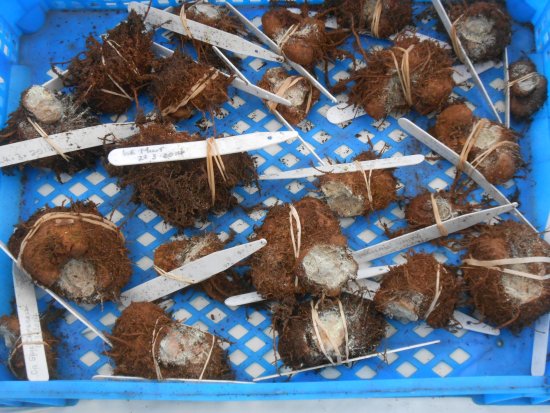
As you can see that from the pictures below
the cutting tubers are a good size, even the
smallest ones are of a good size and they all look
healthy.
Cleaning schedule update phase 1 –
 The
propagating greenhouse has been stripped out and
given a good brush down. I have taken the top inch
of the sharp sand out of my two hot box’s and
replaced with fresh sharp sand. All of the glass,
the greenhouse frame and hot box sides have been
sprayed down with Armillatox. The sharp sand in the
hot boxes has been drenched with Jeyes Fluid along
with the greenhouse floor and base wall. The
propagating greenhouse will now be left to dry out
naturally, and a Sulphur Candle ignited which will
disperse fumes which will kill any bugs and fungi. I
know it sounds a bit like over kill – but I like to
start with a clean slate so to speak.
The
propagating greenhouse has been stripped out and
given a good brush down. I have taken the top inch
of the sharp sand out of my two hot box’s and
replaced with fresh sharp sand. All of the glass,
the greenhouse frame and hot box sides have been
sprayed down with Armillatox. The sharp sand in the
hot boxes has been drenched with Jeyes Fluid along
with the greenhouse floor and base wall. The
propagating greenhouse will now be left to dry out
naturally, and a Sulphur Candle ignited which will
disperse fumes which will kill any bugs and fungi. I
know it sounds a bit like over kill – but I like to
start with a clean slate so to speak.
‘The Caledonian Tours’ 2015 schedule’
Many of the journeys both my great late friend
Les Smith and I made to Scotland (up north) were
nick named ‘The Caledonian Tours’. We only needed
the smallest of reasons to make a flask up and some
sandwiches and hit the high road, or was it the low
road? To where our journey’s end would be either a
Begonia meeting or an Open Day, a flower show or
visiting other growers and their greenhouses.
The first ‘tour’ of this year kicks off on Sunday
8th. February 2015 ‘Up North’ to the
first Scottish Begonia Meeting of the year – p.s
I will have two spades in the boot for Bob & Vincent
just in case the weather conditions get interesting.
If by any chance Alan & Barbara Bryce read this
article, I hope they still think of us ‘growers’
back in Blighty and the unpredictable British
weather whilst they’re sat in the Spanish sun with a
glass of sangria watching their cacti collection
grow………..slowly.