
Episode 6
The trails & tribulations of an amateur grower.
Problems and errors that have befallen me over the years
I hope this instalment helps our newer growers (and maybe an
experienced grower or 2) escape some of the problems I have experienced
over the years either due to errors of misjudgement on my behalf or
Mother Nature getting the better of me.
As the saying goes - Forewarned is Forearmed.
Issues
down to Mother Nature fighting back
T.M!!!!! (Tarsonamid Mite)– I just have to mention this one.
Just like the following its name cannot be uttered-
• The Scottish play beginning with Mc!
• Lord V from the Harry Potter films.
 All I will say is that you have to be very careful who you get any
new plants off, and
All I will say is that you have to be very careful who you get any
new plants off, and when you do get any then keep them quarantined away
from your own plants.
when you do get any then keep them quarantined away
from your own plants.
The phase “better safe than sorry” certainly springs to mind.
I use the biological control Ambysylius Cucumeris the natural predator
of the “TM” as a precautionary measure, I always but a couple of extra
sachets in the greenhouse then what stated.
Vine
Weevils –
 I have never really suffered from Vine Weevil attacks because I
have always used protection so to speak against them. As part of my
arsenal over the years I have used the following precautions to prevent
attack.
I have never really suffered from Vine Weevil attacks because I
have always used protection so to speak against them. As part of my
arsenal over the years I have used the following precautions to prevent
attack.
• When I used to get my Johns Innes No2 from Singletons, I used to
order it with a Vine Weevil Chemical control called Intercept already
mixed in.
• I was then lucky enough to get hold of a chemical control called
Suscon Green which I added to my homemade Seed Compost. With the reason
that the seed compost containing Suscon Green was around the tuber
protecting it all year without having to add more to other potting up
mixes. This has worked the best for me but I have long since run out of
that.
• That now leaves me with Provado Vine Weevil Killer – which works
well, but now has to be applied about x3 times across the year to be on
the safe side. This is not affected by temperature fluctuations.
• There are growers now that use the green control via predators –
but I have heard they are temperamental and are vulnerable to
temperature fluctuations so I have not used them for that reason
especially towards the end of the growing season as from September
onwards the temperatures can really drop out at night.
The only sign of attacks I seem to suffer with are with the begonias
that are planted out in the garden.
Spiders
–
Yes I have said Spiders – they are a benefit in many ways but they
can cause mischief.
 This happened to me many years ago running into Leeds Flower Show with
regards a variety called Lancelot. I have always liked the form of this
variety and knew it could make a good flower. If anyone has any doubts
about this variety then look at picture of Ian Donaldson’s exhibit from
Ayr Flower Show a few years back. It was approx. a week and half to go
before the show date and I had it up to about 7.5 inches (that was
brilliant for me back then) and it looked perfect until I found a big
black spot on one of the centre petals that had appeared overnight.
This happened to me many years ago running into Leeds Flower Show with
regards a variety called Lancelot. I have always liked the form of this
variety and knew it could make a good flower. If anyone has any doubts
about this variety then look at picture of Ian Donaldson’s exhibit from
Ayr Flower Show a few years back. It was approx. a week and half to go
before the show date and I had it up to about 7.5 inches (that was
brilliant for me back then) and it looked perfect until I found a big
black spot on one of the centre petals that had appeared overnight.
I gently tried to move it with a cotton bud but it was hard and I
did more damage than good. It turned out to be a lump of “spider poo”.
Did I kick some plant pots around that day whilst calling our so called
8 legged friends every name under the sun?
If it ever happens again I will leave it on, at least the bloom will be
undamaged by my hand when it’s shown.
Normal
Caterpillars –
I have only ever encountered this issue once – this was a big brown
hairy thing which was quickly despatched!
Now I have suffered incursions from the following type of “Caterpillar”.
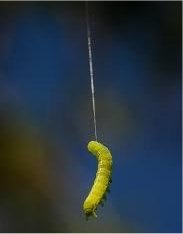
Tortrix
moths -
These little critters can creep up on you no matter how much mesh
you put over your louvre vents and doors.
 I have encountered these in the caterpillar stage on a couple of
occasions in the following ways –
I have encountered these in the caterpillar stage on a couple of
occasions in the following ways –
• When you brush against a leaf and you notice something green drop
off the leaf then just hangs in mid-air attached to thin thread.
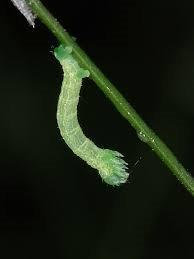
• What looks like transparent spots on the leaf and when you turn
the leaf over you can find a colony of small green caterpillars feeding
on one of your precious leaves and plant.
• I just despatch them between finger and thumb. As it’s hard to spray
when your flowers are opening or are in flower but when the flower
period is over you can spray them.
• I only seem to encounter this threat when the blooms are out so
spraying is not an issue.
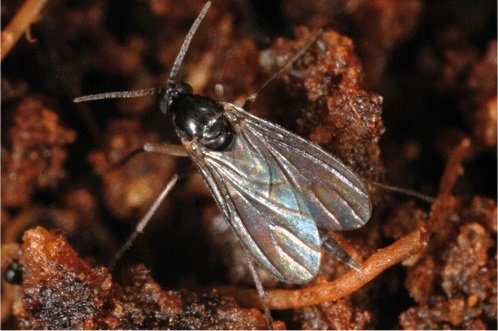
Sciarid
Flies –
 Everyone will come across these very little black fly’s (they look
like midges); they don’t fly high but kind
Everyone will come across these very little black fly’s (they look
like midges); they don’t fly high but kind of “flit” across the top of
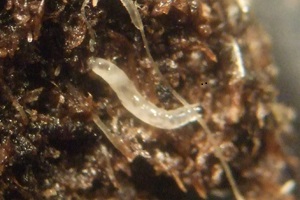
the compost as they search for decaying matter. They look harmless, but
they can lay their eggs in the root system of your plant and when they
hatch can and will eat the roots of the plant. I just place some sticky
fly traps just above the surface of the compost, this solution usually
works for me and hopefully controls the problem before it happens.
of “flit” across the top of
the compost as they search for decaying matter. They look harmless, but
they can lay their eggs in the root system of your plant and when they
hatch can and will eat the roots of the plant. I just place some sticky
fly traps just above the surface of the compost, this solution usually
works for me and hopefully controls the problem before it happens.
Mildew
-
 I have been lucky enough only to experience this problem towards
the end of the year, this I put down to the following x3 measurers
I have been lucky enough only to experience this problem towards
the end of the year, this I put down to the following x3 measurers
• An almost OCD approach to cleaning down the Greenhouses and
equipment at the start of the year.
• A preventative mid-season spray using Systhane Fungus Fighter.
• Another spray after the flowers have finished.
Issues
down to me!!
Stem
rot –
 I have encountered stem rot through the following x5 ways -
• My main cause of this is down to my own doing. When I am trying
to bend / train the leafs out of the way of the opening flower or when
putting the collar on behind the opening bud as some varieties have a
very stiff leaf and if you’re not careful they can snap off right at the
stem. Even when I clean and dust the wound with sulphur, most of the
time it just keeps starting up again. I now just paint the infected area
with Rovral and let it dry. Hopefully this will keep the infection in
check until I have got the bloom off the plant then I just cut the stem
back below the wound.
• Sometimes a bottom leaf is covered with your choice of growing
medium when you are “potting on” or “top dressing” your pot. If this
leaf comes away it leaves a wound below the surface of the medium. If
you are lucky you can visibly see that the leaf is ready to come away,
and you can gently pull it out leaving a clear hole down to the wound. A
thin paintbrush dipped in sulphur can reach down to treat the wound and
reduce the risk of stem rot below your chosen medium surface line.
• Watering your plant carelessly by splashing the stem with water
can lead to stem rot – so always water away from the stem towards edge
of the pot. This will reduce the risk of stem rot occurring at the base
of the stem.
• When taking a cutting from a leaf axle a lot of growers make a v
shape cut at the junction between the stem and leaf axle then gently
push it out – when I have tried this method I found it can be a cause of
stem rot due to the wound being so close to the stem.
I always take the cutting a ¼ to ½ inch up the “cuttings stem” then
pinch out the top part of the “stub” left. Then it just “crystalizes” at
the bottom and drops off clean and eliminates the chance of infection.
• Another cause of stem rot is when you take the side buds of your
chosen flower bud and pinch the tops off them. After about a week these
little “stubs” will fall off, and if you are unlucky you can guarantee
that one will fall into a leaf and stem joint resulting in rot back
causing a source of infection via the stem and into the plant. My way of
eliminating this issue is after a week has pasted I check for x2 stubs
off each de-budded plant. Doing this saves a lot of problems later on
with regards rot.
“New Shoot rot” – (sorry only way I can describe the issue)
This happens when you put a lid on your hotbox to turn it into a
propagator. When the new shoots and 1st pair of leaves are emerging from
above your compost the warm moisture raise’s from the compost and then
hits the roof, then droplets of moisture fall back down. They can and
will land on the new shoots and the 1st pair of leaves that are starting
to emerge from the compost, then before you realize it that little shoot
has rotted off.
The way I combat this issue is when the new shoots are starting to come
through the surface I take the “solid lid” from off the hotbox and then
just put a couple of layers of garden fleece over the hotbox. This
allows the air to circulate and hopefully eliminate the chances of this
happening
Over
watering –
When I first started to grow our beloved choice of flower I found
that after I had potted them up into their first pot, a white fungal
growth appeared growing on the compost surface. It took me a while to
realise what I had done – overwatered. Then the sight in my only
greenhouse back then was a number of plants stood on top of their upside
down pots with a heater on trying to help dry them out a little. It is a
little daunting when a new potential begonia member / grower hears that
watering is one of the hardest parts of begonia growing. I have come to
realise it’s not that bad if you remember the following x2 points -
• Water sparingly in the early part of the year as the root is still
trying to fill the pot.
• When the roots fill the pot and you have a good plant above ground,
the plant will guzzle water so to speak and overwatering does not become
as much as a problem.
So it’s just a case of fewer roots less water.
Letting
a plant in flower dry out –
At the beginning when I started to try and grow for exhibiting I
broke the cardinal sin of all…. Never put something off to do later,
that could be done then. This happened x2 weeks before my first
Southport Flower Show I was going out to see my brother for a brew one
Saturday morning, but on checking my plants and flowers before I went
out I noticed a few plants beginning to look a little dry but I thought
they would be ok for a couple of hours at most until I got back. However
to cut a long story short this brew turned into a barbecue and I got
home in the early evening only to find 10 plants whose flowers petals
had nearly collapsed and no amount of water could recover them – that
was a harsh but important lesson that has never happened to me since.
Sun Scorch –
This has happened to me once but I never saw the effects till about 2
weeks later. I
 had just moved my plants into my main greenhouse in early
May on a Sunday and since it was getting late I left them with the
intention of shading the greenhouse the next day Monday after work.
According to BBC weather on television on Saturday night it just said
the next 5 days would be showers and cloudy weather so I thought I would
be safe. Well how wrong could I have been the sun broke on Monday and I
was stuck on a 0600-1400hr shift, as soon as I got home I went straight
for the Coolglass and the greenhouse was shaded. I honestly thought I
had got away with it until the plants showed me otherwise a good week
and half later. Now I put shade up before I but plants into any of the
greenhouses and I have not suffered with it since.
had just moved my plants into my main greenhouse in early
May on a Sunday and since it was getting late I left them with the
intention of shading the greenhouse the next day Monday after work.
According to BBC weather on television on Saturday night it just said
the next 5 days would be showers and cloudy weather so I thought I would
be safe. Well how wrong could I have been the sun broke on Monday and I
was stuck on a 0600-1400hr shift, as soon as I got home I went straight
for the Coolglass and the greenhouse was shaded. I honestly thought I
had got away with it until the plants showed me otherwise a good week
and half later. Now I put shade up before I but plants into any of the
greenhouses and I have not suffered with it since.
Cleaning your tubers with Domestos (I know this a contentious one!) -
For 2 years I cleaned my Tubers with Domestos then dried them out and
stored them, they had a beautiful golden brown colour when they went
into storage. What I found when I started my tubers up the following
year was just how many buds then Basel’s the tubers had thrown out, and
it was the same for the 2nd year as well. It resulted in loads of small
buds and not just 2 or 3 big buds that I was looking for. So over the
last 3 years I have not cleaned them with Domestos and it has resulted
in my tubers going back to just producing 2 or 3 big buds that I am
looking for as they produce a better stem for Cut Bloom work – Well this
is my observation and opinion.
Issues
down to the Plant -
What causes the stem of a double tuberous begonia to “split”? –
I don’t really know to be honest – It’s not down to feed or water – I
think that it’s just down to a defect in the genetic makeup of the
plant.
One variety which is renowned for this is
Mrs Dan Ramage. One of the
best ways I have heard of checking for this on this variety is from
George G Thompson from Glasgow who turns Mrs Dan Ramage a quarter turn
each day so he can spot the 1st signs of it happening and then try and
treat it.
Colour
Run / Blotching (yep putting this down to a plant issue) –
They are many theories around about why this happens depending on
which grower you talk to, I will try to explain a couple to you.
• Temperature fluctuations between night and day, as in warm days
and cold nights as your bud is been initialized. I think this could be
one way to explain colour run / blotching so what I do to help overcome
this potential problem is to set up a fan heater to keep the day and
night temperatures roughly the same and eliminating any real
fluctuations in temperature. This seems to work for me.
• Over feeding your plant up to taking your bud. We know Begonias
are not heavy feeders so if you are over feeding your plant the side
effects to this could be colour run / blotching. Since I do not over
feed my begonias then this does not really become an issue to me.
• Moisture in your bud, again as the bud is being initialized the
moisture in the bud is being heated up during a spell of hot weather.
Again I try to eliminate this problem by having adequate shading on my
greenhouses so again it’s an issue I don’t seem to suffer with.
There are times when you can just have a “Dodgy” strain of a variety –
this has happened twice to me on the following x2 varieties – Sweet
Dreams & Falstaff.
Who said
our “hobby” was straight forward or frustration free.


