Episode 3 –
mid February
Writing this diary is helping my own growing in a way that is not
entirely unexpected, because for almost a year now I have been putting
together a cultivation talk at the request of SBS President Bert Nelson
that he made at the end of the 2016 season and I genuinely feel that it
has made me think more about my growing methods in ways that wouldn’t
have happened if I wasn’t writing it down. I can recommend documenting
your own method in detail as a worthwhile exercise if you have the
time.
Likewise, the diary is having a similar affect as it progresses. For
example, something has niggled away at me regarding my ventures into
flowering on a cutting and whilst re-reading through the early January
episode to ensure continuity, I realised what it was and that I could be
creating a potential problem.
The
thing is, if I eventually go 100% cuttings with any particular variety,
the next season I may not have enough sufficiently mature tubers to
start up in early January to provide enough cutting material, so having
given it some thought, what I eventually plan to do is grow on some of
the previous seasons tubers to maturity, but not in the greenhouse. They
will flower outside in the garden, giving a bit of added colour to my
growing collection of multiflora begonias. The resulting mature tubers
will then be started the following January to give me my early cuttings.
I’ve already done this with a few varieties, not with the intention of
producing cuttings but just for a bit of colour and I haven’t been
disappointed. I just let them grow as they come and don’t remove any
growth and they keep on flowering right passed the end of September and
the colour if anything is stronger than when grown in the greenhouse.
They just get fed at the same time as the multiflora and obviously have
the same pesticide and fungicide treatments to keep them healthy. That
will work fine for the limited number of varieties that I currently grow
on cuttings but I will need a different approach if I end up growing the
majority of varieties this way.
Now
honestly, as much as I enjoy growing these pots for the garden, I cannot
ever see myself growing pots for the show bench – my nerves are frayed
enough as it is watching other growers carrying their pots into the
shows, so goodness only knows what I would be like with my own. I still
have a laugh mind you, when I remember during staging in the wee small
hours at the National at Shrewsbury last year when the most enormous pot
of Charlotte you could imagine that had seemingly sprouted a pair of
legs, walked into the marquee all on its own. As the pot staggered
passed me, a voice that sounded remarkably like John Hamilton gasped, “I
wish I hadn’t watered these yesterday!”
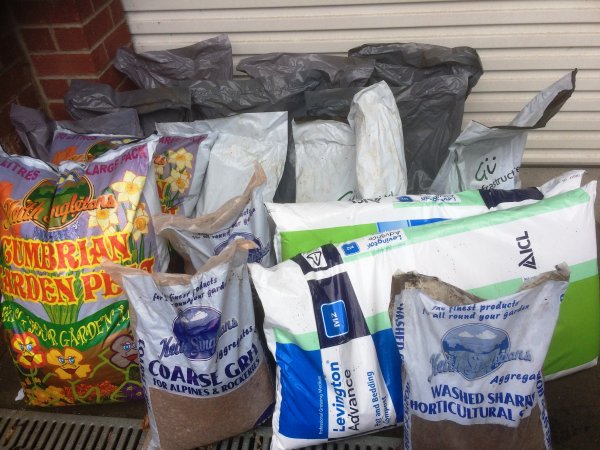
I’ve
made good progress with my plan to have all of the compost materials on
site by mid February, not much more to go now – see below. I arrived
home around lunchtime on the 8th of February to find Colin
Elsworth unloading the last bag of my Kettering loam from his car onto
our drive – timing is everything so the saying goes! Feeling more than a
little guilty, I returned part of the favour that afternoon and went for
our peat, as the garden centre had rang me the day before to tell me
their new batch had arrived. We are lucky to have a fairly local
supplier of Singletons and their Cumbrian peat, coarse grit and sharp
sand are definitely my preferred brands.

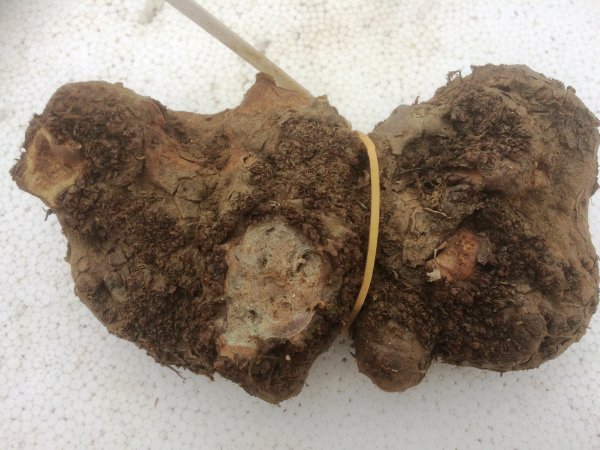
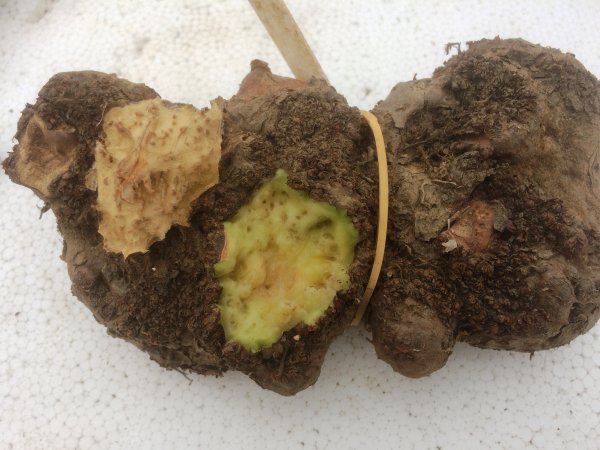
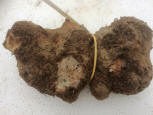
The
early started tubers for my flowering cuttings are progressing, see
below – perhaps just a little bit behind where I would want them but
they should start moving soon, it’s surprising how much growth they can
make in a couple of weeks once they get to this stage and I do prefer to
take a smaller cutting. If they are not quite ready then I’ll just have
to wait a few more days – not the end of the world!

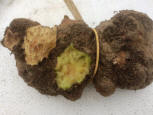
Starting the adult tubers
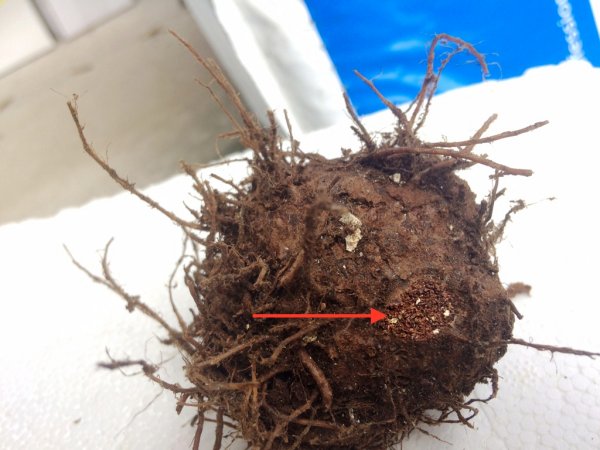
I am
quite fanatical about checking my tubers throughout the winter. I aim to
check them every week and certainly find that this regime pays dividends
as I often find something that could spell trouble if left unattended.
You could liken it to a trip to the dentist for a checkup – it’s things
like a tiny patch of rot or a scab that has been missed; also, sometimes
when stems are really reluctant to come away, I cut them off cleanly as
close to the tuber as I can to allow them to be stored. Eventually these
small sections of stem will shrivel and harden enough for them to be
removed together with the true scab underneath, sometime during the
storage period – see below, but if I were to put them away for the
winter and forget about them this could easily turn to rot and mean the
end of the tuber. What this extra work should mean is that when I
eventually get to the point when it’s time to start them up there are no
nasty surprises – fingers crossed! Incidentally my favourite tool for
this job is a small flat head screwdriver – I know it sound a bit brutal
but I find it does the job with no damage.
The
first job of the starting up regime is to give them all a final check
over. Things that I am looking for are:
●
Any further signs of decay
●
Evidence of pests; specifically
vine weevil grubs – see below
●
Faint writing on the labels
●
Slack or perished elastic bands –
it wouldn’t be the first time that I’ve taken the tubers out of the
bleach solution to find 2 or 3 labels in the bottom of the sink!

So
once the final inspection is done, it’s time for the bleach treatment.
We have a decent sized Belfast type sink in the utility room so this is
where I do them, being very careful to leave no trace of my being there
– I don’t want to run the risk of being exiled to the garden at this
time of year!
Now I
have to admit to being a little bit skeptical about the benefits of this
treatment.
There
are I suppose three perceived benefits:
●
As an
insecticide
●
As a
fungicide
●
As a
rehydration treatment
Against these benefits, the evidence of my own tubers is that some
damage almost always seems to occur to any of the pips that have started
to grow. After 2 or 3 days you can definitely see damage to the outer
layers of the pips, in fact they can often go a bit soft as well. The
outer layers do seem to protect the growing point but damage does occur.
I
sort of get the fungicidal effect (but why not just use a fungicide?)
additionally bleach is also an anti-bacterial treatment so do we also
have the issue of it destroying potentially beneficial bacteria as well
as harmful ones?
The
rehydration element makes complete sense – the response to a soak in
warm water for 15 minutes for begonia tubers that have been stored in
dry conditions for 2 to 3 months can be likened to the reaction of cacti
in the desert to rain and the number of dormant eyes that pip surely
improves although I have no way of proving that but what part does
bleach play in this – would plain water have the same effect? However
I’m not sure about the effect of bleach – sodium hypochlorite – on
insects. All of the information that I have found states that
bleach
is considered a fungicide, a bactericide and an anti-microbial pesticide
– now microbial suggests something like germs to me which is exactly
what is stated – 99.9% – in the T.V.
commercials. Now we begonia growers are talking about mites or
specifically their eggs at this time of year that are virtually
invisible to the naked eye (especially given the average age of us
begonia growers!) but are they to be considered a microbial pest and
does it kill them off?
While
I am still on my high horse about using the bleach treatment, I remember
when I first started growing begonias, reading and also being told that
only Domestos – incidentally invented in a shed in Byker, a suburb of
Newcastle in 1929 – should be used. Now I had assumed that the bleach
being the active ingredient is just bleach, so why does it have to be
the most expensive brand? Well, according to Wikipedia, Domestos
contains 10% of the active ingredient – available chlorine, whereas
other brands may be as low as 5% so perhaps one of these other brands
may not cause the damage that I seem to experience because of this lower
dose? Until I know why, I’ll carry on with Domestos but I would love to
know the answers to the following:
●
Why
10%
●
Does
it kill actually mites and their eggs
●
Does
it significantly harm the tuber
●
Do
begonia tubers have ‘good’ bacteria
Now I
know I’ve gone on and on for a bit too long but I am just thinking out
loud. My jury is still out on this one but what I have done this year is
reduce the concentration of the solution to 5%. There is no harm in
questioning and challenging every aspect of culture, it’s the only way
we can learn and improve. I may be way off target here and what works
for one grower may not for another. If anyone has a different view on
this or anything in my diary just let me know!
What’s keeping me awake at night?
Space
– no not the final frontier – just my usual lack of it!
I’m
certain that I will need some additional propagator space, possibly for
either my main batch of cuttings or the last batch of adult tubers. I
just need to work out the best size to buy given my remaining available
bench space, the trouble is, that will mean I will loose the area that I
have for potting up so solving one problem creates another so I am also
considering putting another propagator under one of the benches – happy
days!
Next
episode – Scottish Begonia Society February meeting and start up progress report.